Posts

Showing posts with the label pattern

Graduation and Teacher Gift Printables - End of the School Year Goodies!

Image
 Here it is, Maycember! Once the month of May starts it quickly snowballs into a continuous stream of concerts, recitals, final games, awards ceremonies, graduations and parties! It's almost too much, and yet, how could it be too much? This is it! This is what it's all for! All the hard work of going to school and taking the tests and practicing the piece and dreaming of the celebration, this is the culmination of all that effort!  Over of the years, as I've prepared teachers' gifts and graduation cards to use, I've saved the printable files to use again in the future or make available for others as well.  Here are some of my favorites: I like these green flowers and the Pink & White cookies at Trader Joe's. I thought they made a nice little bundle for either Teacher Appreciation week or a thank you at the end of the year (if you can keep the cookies around long enough!) Two color options available in case you are low on ink!  LINK TO LISTING Cowboy Caviar f...
pumpkin mustaches

Image
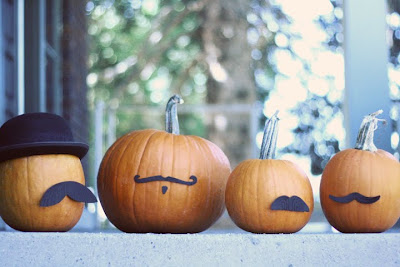
I like to have pumpkins on the porch throughout October. This year, I've pinned on some mustaches until carving time. . . gives them some personality. Now every time I go by them, I want to curtsy. If you'd like some mustaches for your pumpkins, you can download a printable template here . . . Cut them out of black craft foam or felt. Embellish with marker, glitter, puffy paint or whatever you have along the interior lines for a little bit of texture and interest. Tape or pin them on your pumpkins. And then curtsy or tip your hat.

Simple, simple, simple

Image
Happy Easter! Have fun with this. . .

Well, they started out cute. . .

Image
We have a favorite bib from a popular (and expensive) kids' store that we use almost everyday. I decided to copy the pattern (sort of) and make a couple more for Lucy. I thought it was a good chance to use some of my fabric stash and try out the iron on vinyl stuff you can get at the material store that makes any fabric into an oilcoth, basically. Step 1: Iron on vinyl stuff, no problems. Just followed the directions and the fabric looked fantastic. Step 2: Cut it out. . . Now here is where things started to go awry. I thought to myself, I don't want to have to back this bib with another layer of fabric and do the whole "right sides together" and then turn it inside out thing, I'm just going to bind it. So I cut the exact shape of the bib I was copying rather than allow seam allowance. Step 3: I should have stopped there, they looked so cute! But no, I went ahead and did a binding, which I cut on the bias and prepared myself just like I do when I'm binding qui...

happy father's day

Image
This is hubby's tie drawer. Those of you who know him know that he loves organization almost as much as he loves ties. Happy First Official Father's Day as a Father, Mike! I love you! Oh, and if any of you mama's out there are looking for a last minute somethin' for your papa's, hubby recommends ties from Ike Behar or Ted Baker, his favs.

rockabye sweet baby james

Image
This is a fairly modern baby quilt I made for some dear friends' new baby. . . James. I have to give props to Denyse Schmidt for the design (don't you love her?) which is based on her series of Rugby Stripes work quilts. I really enjoyed a podcast I heard a while back where she was interviewed by craftsanity and she said she was glad she's inspired quilters out there and doesn't mind if they mimic her work, it is the greatest form of flattery, right? Anyhow, my dimensions, if you want to know, are: Thick stripes (4 brown and 3 blue) 5.5" x 36" Thin stripes (6 maroon and deep red) 1.5" x 36" one yard of 45" wide fabric for the back 1 1/4 yard of solid red for bias tape, with plenty left to bind another quilt or two Final size is about 36 x 42" P.S. I stick with Denyse's general rule of using mostly solid colors, and then prints and patterns just to add interest. If you run out of a color (or even if you don't) find a scrap in you...

easy baby skirt

Image
Hubby came home awhile ago with these darling baby legs for Lu but they sat in a drawer waiting for something to wear them with. So, I made her this little skirt out of a light corduroy and (the part that makes the skirt cute) this new Michael Miller trim ! I sewed it around the inside of the bottom edge of the skirt so just half would show, like a little scallop edge. It would look great on the outside, as well, like a huge ric rac, which is what I may use the rest for on an old skirt of my own. . . you know, jazz it up a bit because I'm bored of it as is. Anyhow. . . thanks, Kathy Miller, for letting be part of the first group to see and use the Ruffle Rac ! I love it! Free pattern here . . .

Reversible Wrap Dress

Image
This little dress was fairly easy and quick to make, thanks fto the easiest closures in the world. . . ribbons! No buttons, snaps, or zippers here just easy little ribbons to tie. One pair on each side. I also just used the top half of this pattern for Lucy's ladybug costume. I have ideas for other ways to use it and since I'm clearly not getting bored of making things for little Lu I'm sure you'll see more soon.

Just like making doll clothes . . .

Image
So our amazing friend, Katherine, took these beautiful pictures of Lucy. . . it's going to be hard to choose which to use for a birth announcement! She really has a good eye and gave us plenty to choose from. Check out her blog to see more of us and all the other beautiful photography she does! Lucy is still so little, she doesn't fit any of the 0-3 month clothing and have you noticed they just don't make dresses in newborn or preemie sizes? So I made this little dress for her to wear for her big photo shoot. I made it entirely from one Michael Miller fat quarter, that's how small it is!

Bib project

Image
So another fun project I did while on bed rest was to embellish these little bibs from Ikea . . . they come in a 5-pack (I still have one to finish, a robin) for a very reasonable price and they were just screaming for a little something personal to be added to them. This actually started as a project to do with my friend Kate who was on bed rest at home a couple weeks before me. . . I went over to her place to keep her company and brought bags of embroidery floss and fleece (fleece edges won't fray so you don't have to worry about turning the edges under) and we went about doing some free-style appliqué, as I call it. We didn't get too far that day, we each finished only one, but the good thing is it was all bagged up with the needed materials so when I ended up in the hospital unexpectedly, it wasn't hard for hubby to assemble and bring in for me to work on. P.S. Kate ended up having her little Norah just down the hall from me in the hospital two weeks before I had Lu...

More projects from the hospital bed. . .

Image
So while I was on bed rest at the hospital I was able to finish up the quilt I'd started for the baby. I hand quilted it on a 14" hoop which was easily manageable. Here's how it washed up. . .